d
Class components, E2E-testing
During the course we have only used React components having been defined as Javascript functions. This was not possible without the hook-functionality that came with version 16.8 of React. Before, when defining a component that uses state one had to define it using Javascript's Class-syntax.
It is beneficial to at least be familiar with Class Components to some extent, since the world contains a lot of old React code, which will probably never be completely rewritten using the updated syntax.
Class Components
Let's get to know the main features of Class Components by producing yet another very familiar anecdote application. We store the anecdotes in the file db.json using json-server. The contents of the file are lifted from here.
The initial version of the Class Component look like this
import React from 'react'

class App extends React.Component {
  constructor(props) {
    super(props)
  }

  render() {
    return (
      <div>
        <h1>anecdote of the day</h1>
      </div>
    )
  }
}

export default App
The component now has a constructor, in which nothing happens at the moment, and contains the method render. As one might guess, render defines how and what is rendered to the screen.
Let's define a state for the list of anecdotes and the currently visible anecdote. In contrast to when using the useState-hook Class Components only contain one state. So if the state is made up of multiple "parts" they should be stored as properties of the state. The state is initialized in the constructor:
class App extends React.Component {
  constructor(props) {
    super(props)

    this.state = {      anecdotes: [],      current: 0    }  }

  render() {
    if (this.state.anecdotes.length == 0 ) {      return <div>no anecdotes...</div>
    }

    return (
      <div>
        <h1>anecdote of the day</h1>
        <div>
          {this.state.anecdotes[this.state.current].content}        </div>
        <button>next</button>
      </div>
    )
  }
}
The component state is in the instance variable this.state. The state is an object having two properties. this.state.anecdotes is the list of anecdotes and this.state.current is the index of the currently shown anecdote.
In Functional components the right place for fetching data from a server is inside an effect hook, which is executed when a component renders or less frequently if necessary, e.g. only in combination with the first render.
The lifecycle-methods of Class Components offer corresponding functionality. The correct place to trigger the fetching of data from a server is inside the lifecycle-method componentDidMount, which is executed once right after the first time a component renders:
class App extends React.Component {
  constructor(props) {
    super(props)

    this.state = {
      anecdotes: [],
      current: 0
    }
  }

  componentDidMount = () => {    axios.get('http://localhost:3001/anecdotes').then(response => {      this.setState({ anecdotes: response.data })    })  }
  // ...
}
The callback function of the HTTP request updates the component state using the method setState. The method only touches the keys that have been defined in the object passed to the method as an argument. The value for the key current remains unchanged.
Calling the method setState always trigger the rerender of the Class Component, i.e. calling the method render.
We'll finish off the the component with the ability to change the shown anecdote. The following is the code for the entire component with the addition highlighted:
class App extends React.Component {
  constructor(props) {
    super(props)

    this.state = {
      anecdotes: [],
      current: 0
    }
  }

  componentDidMount = () => {
    axios.get('http://localhost:3001/anecdotes').then(response => {
      this.setState({ anecdotes: response.data })
    })
  }

  handleClick = () => {    const current = Math.round(      Math.random() * this.state.anecdotes.length    )    this.setState({ current })  }
  render() {
    if (this.state.anecdotes.length === 0 ) {
      return <div>no anecdotes...</div>
    }

    return (
      <div>
        <h1>anecdote of the day</h1>
        <div>{this.state.anecdotes[this.state.current].content}</div>
        <button onClick={this.handleClick}>next</button>      </div>
    )
  }
}
For comparison here is the same application as a Functional component:
const App = () => {
  const [anecdotes, setAnecdotes] = useState([])
  const [current, setCurrent] = useState(0)

  useEffect(() =>{
    axios.get('http://localhost:3001/anecdotes').then(response => {
      setAnecdotes(response.data)
    })
  },[])

  const handleClick = () => {
    setCurrent(Math.round(Math.random() * anecdotes.length))
  }

  if (anecdotes.length === 0) {
    return <div>no anecdotes...</div>
  }

  return (
    <div>
      <h1>anecdote of the day</h1>
      <div>{anecdotes[current].content}</div>
      <button onClick={handleClick}>next</button>
    </div>
  )
}
In the case of our example the differences were minor. The biggest difference between Functional components and Class components is mainly that the state of a Class component is a single object, and that the state is updated using the method setState, while in Functional components the state can consist of multiple different variables, with all of them having their own update function.
In some more advanced use cases the effect hook offers a considerably better mechanism for controlling side effects compared to the lifecycle-methods of Class Components.
A notable benefit of using Functional components is not having to deal with the self referencing this-reference of the Javascript class.
In my opinion, and the opinion of many others, Class Components offer basically no benefits over Functional components enhanced with hooks, with the exception of the so-called error boundary mechanism, which currently (21.6.2019) isn't yet in use by functional components.
When writing fresh code there is no rational reason to use Class Components if the project is using React with a version number 16.8 or greater. On the other hand, there is currently no need to rewrite all old React code as Functional components.
End to end testing of the application
Let's return to testing for a bit. In previous parts we wrote unit tests, as well as integration tests, for the applications. Now we take a look at a way to create End to End (E2E) -tests which inspect the entire system.
E2E-testing of web applications is done using the browser with the help of some library. There are plenty of solutions out there, e.g. Selenium, which enables automatic tests using practically any browser.
In the previous version of this course E2E-tests were done using the puppeteer-library, which provides a direct interface for using the chrome browser in a so-called headless-mode, meaning the browser doesn't display its graphical user interface.
Even though E2E for web applications has been technologically possible for more than ten years it has been woefully difficult, especially when it comes to applications created using the Single Page App(SPA) -principle. SPA-tests have often been unreliable, or some might say flaky: sometimes particular tests pass and sometimes they don't, even though the code remains unchanged.
In the year 2018 a software library called Cypress has quickly grown in favor in E2E-testing. Cypress is exceptionally easy to use. The amount of legwork one has to do compared to using, e.g. Selenium, is practically non existent. Cypress' way of operating differs radically from most libraries used for E2E-testing. This is because Cypress-tests are all run entirely within the browser. With other approaches the tests are in a Node-process, which is connected to the browser through the APIs that it offers.
Let's make a few tests for that notes application we made in parts 2-5.
We install cypress
npm install --save-dev cypressand then we define an npm-script for starting the tests.
{
  // ...
  "scripts": {
    "start": "react-scripts start",
    "build": "react-scripts build",
    "test": "react-scripts test",
    "eject": "react-scripts eject",
    "server": "json-server -p3001 db.json",
    "cypress:open": "cypress open"  },
  // ...
}
Cypress-tests expect the system that is being tested to be running when running the tests.
We make an npm-script for the backend so we can run it such that NODE_ENV gets the value test
{
  // ...
  "scripts": {
    "start": "cross-env NODE_ENV=production node index.js",
    "watch": "cross-env NODE_ENV=development nodemon index.js",
    "build:ui": "rm -rf build && cd ../../osa2/notes/ && npm run build --prod && cp -r build ../../osa3/backend/",
    "deploy": "git push heroku master",
    "deploy:full": "npm run build:ui && git add . && git commit -m uibuild && git push && npm run deploy",
    "logs:prod": "heroku logs --tail",
    "lint": "eslint .",
    "test": "cross-env NODE_ENV=test jest --verbose --runInBand",
    "start:test": "cross-env NODE_ENV=test node index.js"  },
  // ...
}
When the backend and frontend are running we can start Cypress using the command
npm run cypress:openIn the project there will appear a directory called cypress, in which there is a subdirectory integrations where the tests are to be placed. Cypress generates a set of example test. Let's remove them and create our first test into the file note_app_spec.js:
describe('Note ', function() {
  it('front page can be opened', function() {
    cy.visit('http://localhost:3000')
    cy.contains('Notes')
  })
})
The execution of the test opens the browser and displays how the application behaves as the test progresses:
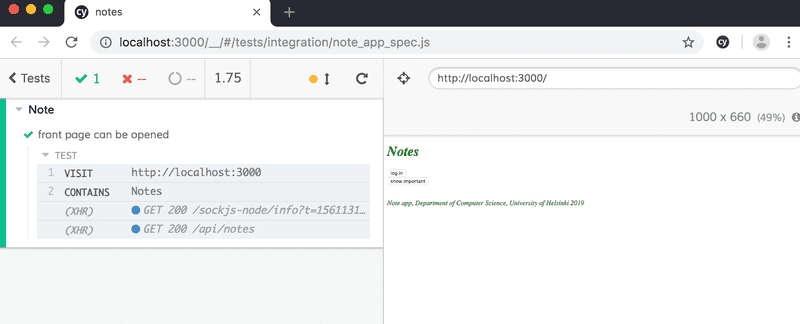
When it comes to the structure of the test it seems quite familiar. describe-blocks are used, just like with Jest, to group individual test cases having been defined using the it-method. These parts have been borrowed from the Mocha testing library, which Cypress uses internally. Mocha was the previous ruler of testing libraries and is still very popular, but Jest has clearly gotten ahead. On the other hand, visit and contains are Cypress commands, both of which have a fairly clear purpose.
We could have also defined the test using arrow functions
describe('Note app', () => {  it('front page can be opened', () => {    cy.visit('http://localhost:3000')
    cy.contains('Notes')
  })
})
However, the documentation for Mocha recommends not to use arrow functions, since they might cause issues in some cases.
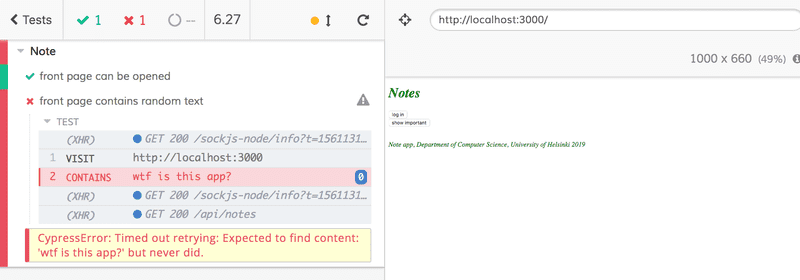
The test doesn't pass if contains cannot find the text it is looking for on the page. So if we add the following test
describe('Note app', function() {
  it('front page can be opened',  function() {
    cy.visit('http://localhost:3000')
    cy.contains('Notes')
  })

  it('front page contains random text', function() {    cy.visit('http://localhost:3000')    cy.contains('wtf is this app?')  })})
Cypress will detect the problem
Let's expand the test such that the test tries to log into the application. We begin by opening the login form.
describe('Note app',  function() {
  // ...

  it('login form can be opened', function() {
    cy.visit('http://localhost:3000')
    cy.contains('log in')
      .click()
  })
})
The test first gets the button based on its content and clicks the button with the command click.
Because both tests start in the same way, by opening the page http://localhost:3000, it is advisable to separate the common part into the beforeEach-block, which is run before each test:
describe('Note app', function() {
  beforeEach(function() {    cy.visit('http://localhost:3000')  })
  it('front page can be opened', function() {
    cy.contains('Notes')
  })

  it('login form can be opened', function() {
    cy.contains('log in')
      .click()
  })
})
The registration form contains two input-fields into which the tests need to input data.
The command get enables the searching of elements using CSS-selectors.
We can get the first and last input-fields of the form and write text into them using the command type as follows:
it('user can login', function () {
  cy.contains('log in')
    .click()
  cy.get('input:first')
    .type('mluukkai')
  cy.get('input:last')
    .type('salainen')
  cy.contains('login')
    .click()
  cy.contains('Matti Luukkainen logged in')
})
The test works but is problematic because if we add more input-fields to the application the test might break, since it expects the required fields to be the first and the last field.
A better (but not optimal according to the documentation) solution would be to define uniquely identifiable id-attributes for the fields and get the field based on that info in the tests. So we expand the login form as follows
const LoginForm = ({ ... }) => {
  return (
    <div>
      <h2>Login</h2>
      <form onSubmit={handleSubmit}>
        <div>
          username
          <input
            id='username'            value={username}
            onChange={handleUsernameChange}
          />
        </div>
        <div>
          password
          <input
            id='password'            type="password"
            value={password}
            onChange={handlePasswordChange}
          />
      </div>
        <button type="submit">login</button>
      </form>
    </div>
  )
}
The test changes like so
describe('Note app',  function() {
  // ..
  it('user can login', function() {
    cy.contains('log in')
      .click()
    cy.get('#username')      .type('mluukkai')
    cy.get('#password')      .type('salainen')
    cy.contains('login')
      .click()
    cy.contains('Matti Luukkainen logged in')
  })
})
We create another test which adds a new note to the application:
describe('Note app', function() {
  // ..
  describe('when logged in', function() {
    beforeEach(function() {
      cy.contains('log in')
        .click()
      cy.get('#username')
        .type('mluukkai')
      cy.get('#password')
        .type('salainen')
      cy.contains('login')
        .click()
    })

    it('name of the user is shown', function() {
      cy.contains('Matti Luukkainen logged in')
    })

    it('a new note can be created', function() {      cy.contains('new note')        .click()      cy.get('input')        .type('a note created by cypress')      cy.contains('save')        .click()      cy.contains('a note created by cypress')    })  })
})
Because two of the tests expect a user to be logged in, their common part has again been separated into the beforeEach-block. The test expects there only being one input-field when creating a new note so it gets the field as follows:
cy.get('input')the test breaks if there would be multiple fields
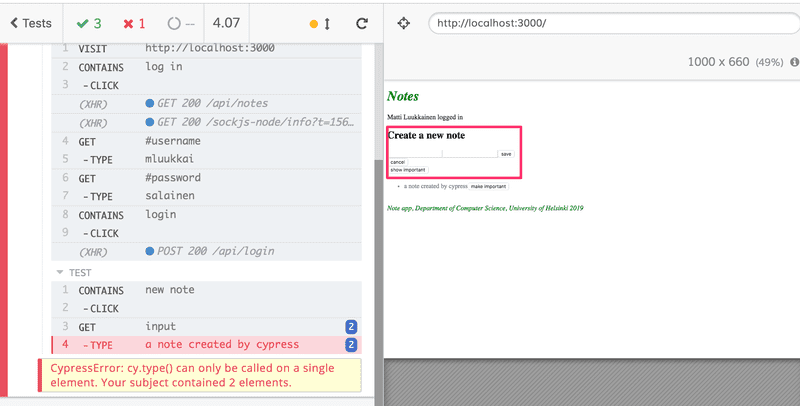
For that reason it would have been better to add an id for the input-field in the form and get the field based on the id in the test.
Controlling the state of the database
If there is a need to modify the database during the tests, the situation gets a bit more tricky. In an ideal situation the testing should always start from the same initial state, so that the tests are reliable and easily repeatable.
A common solution is to reset the database and possibly initialize it appropriately before running the tests. In E2E-testing there is the additional challenge of not having direct access to the database.
This problem can be solved by creating an API endpoint in the backend for the tests, in which the tests can reset the database if necessary. We make a router for the tests
const router = require('express').Router()
const Note = require('../models/note')
const User = require('../models/user')

router.post('/reset', async (request, response) => {
  await Note.deleteMany({})
  await User.deleteMany({})

  response.status(204).end()
})

module.exports = router
and we use it in backend only if the application is run in test-mode:
// ...

app.use('/api/login', loginRouter)
app.use('/api/users', usersRouter)
app.use('/api/notes', notesRouter)

if (process.env.NODE_ENV === 'test') {  const testingRouter = require('./controllers/testing')  app.use('/api/testing', testingRouter)}
app.use(middleware.unknownEndpoint)
app.use(middleware.errorHandler)

module.exports = app
so after the modification an HTTP POST request to the backend endpoint /api/testing/reset empties the database.
The code for the modified backend can be found in full on github, in the branch part7-1.
Right now the user interface of the application has no ability to add users to the system. Therefore we need to directly create a test-user to the backend when initializing the tests.
describe('Note app', function() {
  beforeEach(function() {
    cy.request('POST', 'http://localhost:3001/api/testing/reset')    const user = {
      name: 'Matti Luukkainen',
      username: 'mluukkai',
      password: 'salainen'
    }
    cy.request('POST', 'http://localhost:3001/api/users/', user)    cy.visit('http://localhost:3000')
  })

  it('front page can be opened', function() {
    cy.contains('Notes')
  })
})
During the initialization the test makes HTTP requests to the backend using the command request. We move the previously created test for the creation of a note to the describe block
describe('Note app', function() {
  // ...

  describe('when logged in', function() {
    beforeEach(function() {
      cy.contains('log in')
        .click()
      cy.get('#username')
        .type('mluukkai')
      cy.get('#password')
        .type('salainen')
      cy.contains('login')
        .click()
    })

    it('name of the user is shown', function() {
      cy.contains('Matti Luukkainen logged in')
    })

    it('a new note can be created', function() {
      cy.contains('new note')
        .click()
      cy.get('input')
        .type('a note created by cypress')
      cy.contains('save')
        .click()
      cy.contains('a note created by cypress')
    })
  })
})
Unlike before, now the testing always starts from an identical state: one user in the database and no notes.
Let's add one more test which makes sure the importance of notes can be changed. First we modify the frontend of the application so that a new note is unimportant by default, in other words the field important gets the value false:
const App = () => {
  // ...
  const addNote = (event) => {
    event.preventDefault()
    noteFormRef.current.toggleVisibility()
    const noteObject = {
      content: newNote,
      important: false    }

    noteService
      .create(noteObject).then(returnedNote => {
        setNotes(notes.concat(returnedNote))
        setNewNote('')
      })
  }

  // ...
}
There are several ways to test the case. In the following we first find the note and click its button make important. Then we make sure that the note contains the button make not important.
describe('Note app', function() {
  // ...

  describe('when logged in', function() {
    // ...

    describe('and a note is created', function () {
      beforeEach(function () {
        cy.contains('new note')
          .click()
        cy.get('input')
          .type('another note cypress')
        cy.contains('save')
          .click()
      })

      it('it can be made important', function () {
        cy.contains('another note cypress')
          .contains('make important')
          .click()

        cy.contains('another note cypress')
          .contains('make not important')
      })
    })
  })
})
The tests and the code for the frontend can be found in full on github, in the branch part7-1.
Cypress provides fairly good ways of debugging the tests. It is very easy to inspect the state of the DOM for each step of the execution.
The documentation for Cypress is exceptionally good. I strongly recommend trying Cypress!

