c
Testing React apps
There are many different ways of testing React applications. Let's take a look at them next.
Tests will be implemented with the same Jest testing library developed by Facebook that was used in the previous part. Jest is actually configured by default to applications created with create-react-app.
In addition to Jest, we also need another testing library that will help us render components for testing purposes. The best option for this used to be the enzyme library developed by Airbnb. Unfortunately, Enzyme does not support React hooks properly, so we will instead use react-testing-library which has seen rapid growth in popularity in recent times.
Let's install the library with the command:
npm install --save-dev @testing-library/react @testing-library/jest-domLet's first write tests for the component that is responsible for rendering a note:
const Note = ({ note, toggleImportance }) => {
  const label = note.important
    ? 'make not important'
    : 'make important'

  return (
    <li className='note'>      {note.content}
      <button onClick={toggleImportance}>{label}</button>
    </li>
  )
}
Notice that the li element has the CSS classname note, that is used to access the component in our tests.
Rendering the component for tests
We will write our test in the src/components/Note.test.js file, which is in the same directory as the component itself.
The first test verifies that the component renders the contents of the note:
import React from 'react'
import '@testing-library/jest-dom/extend-expect'
import { render } from '@testing-library/react'
import Note from './Note'

test('renders content', () => {
  const note = {
    content: 'Component testing is done with react-testing-library',
    important: true
  }

  const component = render(
    <Note note={note} />
  )

  expect(component.container).toHaveTextContent(
    'Component testing is done with react-testing-library'
  )
})
After the initial configuration, the test renders the component with the render method provided by the react-testing-library:
const component = render(
  <Note note={note} />
)
Normally React components are rendered to the DOM. The render method we used renders the components in a format that is suitable for tests without rendering them to the DOM.
render returns an object that has several properties. One of the properties is called container, and it contains all of the HTML rendered by the component.
In the expectation, we verify that the component renders the correct text, which in this case is the content of the note:
expect(component.container).toHaveTextContent(
  'Component testing is done with react-testing-library'
)
Running tests
Create-react-app configures tests to be run in watch mode by default, which means that the npm test command will not exit once the tests have finished, and will instead wait for changes to be made to the code. Once new changes to the code are saved, the tests are executed automatically after which Jest goes back to waiting for new changes to be made.
If you want to run tests "normally", you can do so with the command:
CI=true npm testNB: the console may issue a warning if you have not installed Watchman. Watchman is an application developed by Facebook that watches for changes that are made to files. The program speeds up the execution of tests and at least starting from macOS Sierra, running tests in watch mode issues some warnings to the console, that can be gotten rid of by installing Watchman.
Instructions for installing Watchman on different operating systems can be found on the official Watchman website: https://facebook.github.io/watchman/
Test file location
In React there are (at least) two different conventions for the test file's location. We created our test files according to the current standard by placing them in the same directory as the component being tested.
The other convention is to store the test files "normally" in their own separate directory. Whichever convention we choose, it is almost guaranteed to be wrong according to someone's opinion.
Personally, I do not like this way of storing tests and application code in the same directory. The reason we choose to follow this convention is that it is configured by default in applications created by create-react-app.
Searching for content in a component
The react-testing-library package offers many different ways of investigating the content of the component being tested. Let's slightly expand our test:
test('renders content', () => {
  const note = {
    content: 'Component testing is done with react-testing-library',
    important: true
  }

  const component = render(
    <Note note={note} />
  )

  // method 1
  expect(component.container).toHaveTextContent(
    'Component testing is done with react-testing-library'
  )

  // method 2
  const element = component.getByText(
    'Component testing is done with react-testing-library'
  )
  expect(element).toBeDefined()

  // method 3
  const div = component.container.querySelector('.note')
  expect(div).toHaveTextContent(
    'Component testing is done with react-testing-library'
  )
})
The first way searches for a matching text from the entire HTML code rendered by the component.
The second way uses the getByText method of the object returned by the render method. The method returns the element that contains the given text. An exception occurs if no such element exists. For this reason, we would technically not need to specify any additional expectation.
The third way is to search for a specific element that is rendered by the component with the querySelector method that receives a CSS selector as its parameter.
Debugging tests
We typically run into many different kinds of problems when writing our tests.
The object returned by the render method has a debug method that can be used to print the HTML rendered by the component to the console. Let's try this out by making the following changes to our code:
test('renders content', () => {
  const note = {
    content: 'Component testing is done with react-testing-library',
    important: true
  }

  const component = render(
    <Note note={note} />
  )

  component.debug()
  // ...
})
We can see the HTML generated by the component in the console:
console.log node_modules/@testing-library/react/dist/index.js:90
  <body>
    <div>
      <li
        class="note"
      >
        Component testing is done with react-testing-library
        <button>
          make not important
        </button>
      </li>
    </div>
  </body>
It is also possible to search for a smaller part of the component and print its HTML code. In order to do this, we need the prettyDOM method that can be imported from the @testing-library/dom package that is automatically installed with react-testing-library:
import React from 'react'
import '@testing-library/jest-dom/extend-expect'
import { render } from '@testing-library/react'
import { prettyDOM } from '@testing-library/dom'import Note from './Note'

test('renders content', () => {
  const note = {
    content: 'Component testing is done with react-testing-library',
    important: true
  }

  const component = render(
    <Note note={note} />
  )
  const li = component.container.querySelector('li')

  console.log(prettyDOM(li))})
We used the selector to find the li element inside of the component, and printed its HTML to the console:
console.log src/components/Note.test.js:21
  <li
    class="note"
  >
    Component testing is done with react-testing-library
    <button>
      make not important
    </button>
  </li>
setup
We'll use a small utility library for jest that helps making tests more readable: jest-dom adds new "matchers" for DOM specific assertions such as toBeVisible or toHaveFocus.
import React from 'react'
import '@testing-library/jest-dom/extend-expect'import { render } from '@testing-library/react'
import { prettyDOM } from '@testing-library/dom'
import Note from './Note'
We could repeat the same import in all of our test files. To prevent repetition and potentially forgetting the import we can use the import once in a single file. Let's create a new src/setupTests.js file for this configuration with the following contents:
import '@testing-library/jest-dom/extend-expect'NB if the configuration defined in the src/setupTests.js file is not used when the tests are run, it may help to add the following configuration to the package.json file:
  "jest": {
    ...
    "setupFiles": [
      "<rootDir>/src/setupTests.js"
    ],
    ...
  }
Clicking buttons in tests
In addition to displaying content, the Note component also makes sure that when the button associated with the note is pressed, the toggleImportance event handler function gets called.
Testing this functionality can be accomplished like this:
import React from 'react'
import { render, fireEvent } from '@testing-library/react'import { prettyDOM } from '@testing-library/dom'
import Note from './Note'

// ...

test('clicking the button calls event handler once', () => {
  const note = {
    content: 'Component testing is done with react-testing-library',
    important: true
  }

  const mockHandler = jest.fn()

  const { getByText } = render(
    <Note note={note} toggleImportance={mockHandler} />
  )

  const button = getByText('make not important')
  fireEvent.click(button)

  expect(mockHandler.mock.calls.length).toBe(1)
})
There's a few interesting things related to this test. The event handler is mock function defined with Jest:
const mockHandler = jest.fn()The test finds the button based on the text from the rendered component and clicks the element:
const button = getByText('make not important')
fireEvent.click(button)
Clicking happens with the fireEvent method.
The expectation of the test verifies that the mock function has been called exactly once.
expect(mockHandler.mock.calls.length).toBe(1)Mock objects and functions are commonly used stub components in testing that are used for replacing dependencies of the components being tested. Mocks make it possible to return hardcoded responses, and to verify the number of times the mock functions are called and with what parameters.
In our example, the mock function is a perfect choice since it can be easily used for verifying that the method gets called exactly once.
Tests for the Togglable component
Let's write a few tests for the Togglable component. Let's add the togglableContent CSS classname to the div that returns the child components.
const Togglable = React.forwardRef((props, ref) => {
  // ...

  return (
    <div>
      <div style={hideWhenVisible}>
        <button onClick={toggleVisibility}>
          {props.buttonLabel}
        </button>
      </div>
      <div style={showWhenVisible} className="togglableContent">        {props.children}
        <button onClick={toggleVisibility}>cancel</button>
      </div>
    </div>
  )
})
The tests are shown below:
import React from 'react'
import { render, fireEvent } from '@testing-library/react'
import Togglable from './Togglable'

describe('<Togglable />', () => {
  let component

  beforeEach(() => {
    component = render(
      <Togglable buttonLabel="show...">
        <div className="testDiv" />
      </Togglable>
    )
  })

  test('renders its children', () => {
    component.container.querySelector('.testDiv')
  })

  test('at start the children are not displayed', () => {
    const div = component.container.querySelector('.togglableContent')

    expect(div).toHaveStyle('display: none')
  })

  test('after clicking the button, children are displayed', () => {
    const button = component.getByText('show...')
    fireEvent.click(button)

    const div = component.container.querySelector('.togglableContent')
    expect(div).not.toHaveStyle('display: none')
  })

})
The beforeEach function gets called before each test, which then renders the Togglable component into the component variable
The first test verifies that the Togglable component renders its child component <div className="testDiv" />.
The remaining tests use the toHaveStyle method to verify that the child component of the Togglable component is not visible initially, by checking that the style of the div element contains { display: 'none' }. Another test verifies that when the button is pressed the component is visible, meaning that the style for hiding the component is no longer assigned to the component.
The button is searched for once again based on the text that it contains. The button could have been located also with the help of a CSS selector:
const button = component.container.querySelector('button')The component contains two buttons, but since querySelector returns the first matching button, we happen to get the button that we wanted.
Let's also add a test that can be used to verify that the visible content can be hidden by clicking the second button of the component:
test('toggled content can be closed', () => {
  const button = component.container.querySelector('button')
  fireEvent.click(button)

  const closeButton = component.container.querySelector(
    'button:nth-child(2)'
  )
  fireEvent.click(closeButton)

  const div = component.container.querySelector('.togglableContent')
  expect(div).toHaveStyle('display: none')
})
We defined a selector that returns the second button button:nth-child(2). It's not a wise move to depend on the order of the buttons in the component, and it is recommended to find the elements based on their text:
test('toggled content can be closed', () => {
  const button = component.getByText('show...')
  fireEvent.click(button)

  const closeButton = component.getByText('cancel')
  fireEvent.click(closeButton)

  const div = component.container.querySelector('.togglableContent')
  expect(div).toHaveStyle('display: none')
})
The getByText method that we used is just one of the many queries react-testing-library offers.
You can find the code for our current application in its entirety in the part5-7 branch of this Github repository.
Testing forms
In the previous tests, we used the fireEvent function for clicking buttons:
const button = component.getByText('show...')
fireEvent.click(button)
In practice, we used fireEvent to create a click event for the button component. We can also use fireEvent to simulate filling forms.
Let's write a test for the NoteForm component. The code for the form looks like this:
const NoteForm = ({ onSubmit, handleChange, value }) => {
  return (
    <div>
      <h2>Luo uusi muistiinpano</h2>

      <form onSubmit={onSubmit}>
        <input
          value={value}
          onChange={handleChange}
        />
        <button type="submit">save</button>
      </form>
    </div>
  )
}
The operating principle of the form is to synchronize the state of the input with the state of its parent React component. It is quite difficult to test the form on its own.
For this reason, we will create a helper Wrapper component that renders the NoteForm and manages its state with the state prop that it receives:
const Wrapper = (props) => {

  const onChange = (event) => {
    props.state.value = event.target.value
  }

  return (
    <NoteForm
      value={props.state.value}
      onSubmit={props.onSubmit}
      handleChange={onChange}
    />
  )
}
Our test is as follows:
import React from 'react'
import { render, fireEvent } from '@testing-library/react'
import NoteForm from './NoteForm'

const Wrapper = (props) => {
  // ...
}

test('<NoteForm /> updates parent state and calls onSubmit', () => {
  const onSubmit = jest.fn()
  const state = {
    value: ''
  }

  const component = render(
    <Wrapper onSubmit={onSubmit} state={state} />
  )

  const input = component.container.querySelector('input')
  const form = component.container.querySelector('form')

  fireEvent.change(input, { target: { value: 'testing of forms could be easier' } })
  fireEvent.submit(form)

  expect(onSubmit.mock.calls.length).toBe(1)
  expect(state.value).toBe('testing of forms could be easier')
})
The test creates a Wrapper component that is passed an onSubmit mock function and a state object for representing the state.
The wrapper passes the function on to the NoteForm as its onSubmit event handler, and the value property of the state prop as the value of the input element.
We simulate writing text into the input element by creating a change event for the input, and by defining a suitable object that defines the content we want to write.
The form is submitted by simulating a submit event for the form.
The first expect of the test verifies that submitting the form results in a call to the event handler. The second expect inspects the state object that was passed to the Wrapper component, and verifies that the value written in the input has become part of the state.
Frontend integration tests
In the previous part of the course material, we wrote integration tests for the backend that tested its logic and connected database through the API provided by the backend. When writing these tests, we made the conscious decision not to write unit tests, as the code for that backend is fairly simple, and it is likely that bugs in our application occur in more complicated scenarios that integration tests are well suited for.
So far all of our tests for the frontend have been unit tests that have validated the correct functioning of individual components. Unit testing is useful at times, but even a comprehensive suite of unit tests is not enough to validate that the application works as a whole.
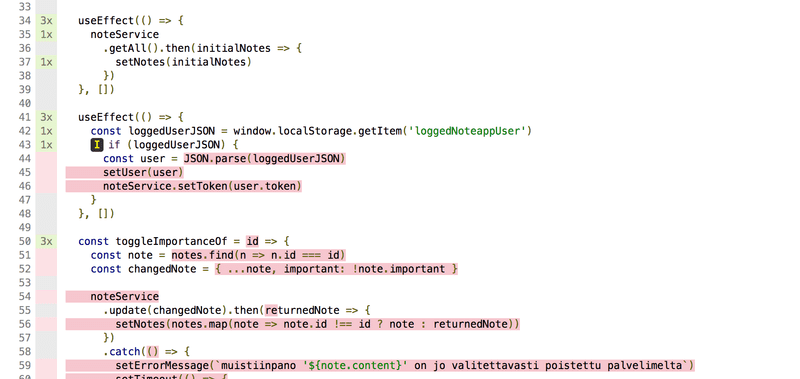
Next, let's write a single integration test for the application. Writing integration tests is considerably more difficult than writing unit tests for individual components. There are two challenges specific to our application: the application fetches the notes from the backend and the application uses local storage for storing information about the user who is logged in.
Local storage is not available to our tests by default, as its functionality is provided by the browser and our tests are not running in the browser. It is quite easy to overcome this challenge by defining a mock that mimics the functionality of the local storage. There are many ways to accomplish this.
As our tests do not rely on any actual local storage functionality, we will write a very simple mock in the src/setupTests.js file:
let savedItems = {}

const localStorageMock = {
  setItem: (key, item) => {
    savedItems[key] = item
  },
  getItem: (key) => savedItems[key],
  clear: () => {
    savedItems = {}
  }
}

Object.defineProperty(window, 'localStorage', { value: localStorageMock })
Our second challenge is that the application fetches its notes from the server. Fetching the notes happens immediately after the App component is created in the effect hook:
const App = () => {
  // ...

  useEffect(() => {
    noteService
      .getAll().then(initialNotes => {
        setNotes(initialNotes)
      })
  }, [])

// ...
}
The manual mock concept from Jest provides us with a good solution. With manual mocks, we can replace an entire module like noteService with an alternative module that can mock the functionality of the module e.g. by returning hardcoded data.
We follow the instructions provided by Jest and create a __mocks__ subdirectory under the src/services directory, and inside the directory we create a new notes.js file that defines a getAll function that returns a hardcoded list of notes:
const notes = [
  {
    id: '5a451df7571c224a31b5c8ce',
    content: 'HTML is easy',
    date: '2019-06-11T16:38:15.541Z',
    important: false,
    user: {
      _id: '5a437a9e514ab7f168ddf138',
      username: 'mluukkai',
      name: 'Matti Luukkainen'
    }
  },
  {
    id: '5a451e21e0b8b04a45638211',
    content: 'Browser can execute only javascript',
    date: '2019-06-11T16:38:57.694Z',
    important: true,
    user: {
      _id: '5a437a9e514ab7f168ddf138',
      username: 'mluukkai',
      name: 'Matti Luukkainen'
    }
  },
  {
    id: '5a451e30b5ffd44a58fa79ab',
    content: 'The most important methods of HTTP are GET and POST',
    date: '2019-06-11T16:39:12.713Z',
    important: true,
    user: {
      _id: '5a437a9e514ab7f168ddf138',
      username: 'mluukkai',
      name: 'Matti Luukkainen'
    }
  }
]

const getAll = () => {
  return Promise.resolve(notes)
}

export default { getAll }
The getAll function returns a list of notes wrapped inside a promise with the Promise.resolve method. This is done because our application expects a promise when it uses the method.
We are ready to write our test. Since this test deals with the entire application, we will write our test in a new App.test.js file:
import React from 'react'
import { render,  waitForElement } from '@testing-library/react'
jest.mock('./services/notes')
import App from './App'

describe('<App />', () => {
  test('renders all notes it gets from backend', async () => {
    const component = render(
      <App />
    )
    component.rerender(<App />)
    await waitForElement(
      () => component.container.querySelector('.note')
    )

    const notes = component.container.querySelectorAll('.note')
    expect(notes.length).toBe(3)

    expect(component.container).toHaveTextContent(
      'HTML is easy'
    )
    expect(component.container).toHaveTextContent(
      'Browser can execute only javascript'
    )
    expect(component.container).toHaveTextContent(
      'The most important methods of HTTP are GET and POST'
    )
  })
})
The jest.mock('./services/notes') command takes our mock into use in the test. Perhaps a more logical place for this command would be in the src/setupTests.js file that configures our tests.
The test starts by re-rendering the component component.rerender(<App />), this is done to ensure that all of the effects are executed. This command may no longer be necessary with newer versions of React.
Since the action for fetching notes from the server is an asynchronous event, we use the waitForElement function for verifying that the App component renders all of the notes.
await waitForElement(() => component.container.querySelector('.note'))Next, we implement the actual expect validations for the test. We do this by verifying that the application has three elements containing the CSS classname note, and that the content of each note is rendered.
Test coverage
The test coverage of our suite of tests is easy to discover by running the tests with the following command:
CI=true npm test -- --coverage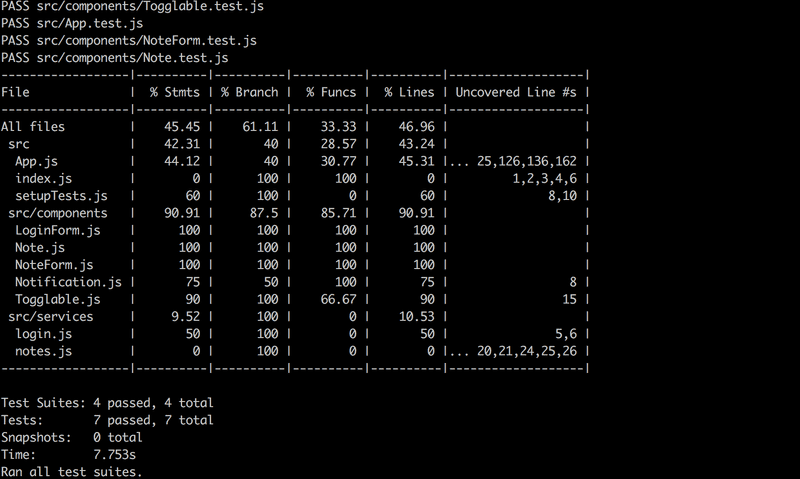
The result is a fairly primitive HTML report that is generated inside the coverage/lcov-report directory. The HTML report tells us the untested lines of code in a component:
As we can see, there is a lot of room for improvement.
Warning in running tests
If you have React version 16.8.6 (the most recent at the time of writing 11th June) or older, you could get the following warning despite the tests passing:
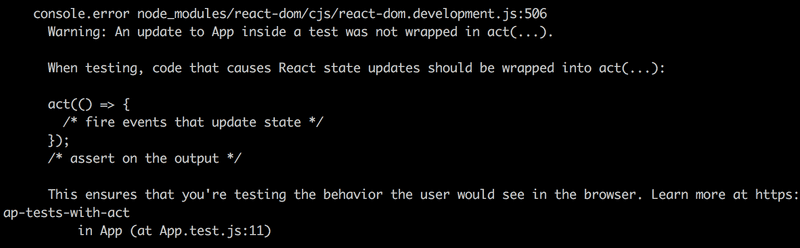
As described here, the warning can be ignored. It is caused by an issue that shall be fixed in React version 16.9.0 that should be released in June/July.
The warning can be silenced by adding the following code to src/setupTests.js
const originalError = console.error
beforeAll(() => {
  console.error = (...args) => {
    if (/Warning.*not wrapped in act/.test(args[0])) {
      return
    }
    originalError.call(console, ...args)
  }
})

afterAll(() => {
  console.error = originalError
})
You can find the code for our current application in its entirety in the part5-8 branch of this Github repository.
Snapshot testing
Jest offers a completely different alternative to "traditional" testing called snapshot testing. The interesting feature of snapshot testing is that developers do not need to define any tests themselves, it is simply enough to adopt snapshot testing.
The fundamental principle is to compare the HTML code defined by the component after it has changed to the HTML code that existed before it was changed.
If the snapshot notices some change in the HTML defined by the component, then either it is new functionality or a "bug" caused by the accident. Snapshot tests notify the developer if the HTML code of the component changes. The developer has to tell Jest if the change was desired or undesired. If the change to the HTML code is unexpected it strongly implicates a bug, and developer can become aware of these potential issues easily thanks to snapshot testing.
End-to-end tests
We have written integration tests for testing the entire component for both the frontend and the backend. We have not yet taken a look at another important category of tests that tests the entire system with "end-to-end" (E2E) tests.
The E2E testing of web applications happens by simulating a browser with a library like Selenium. Another alternative is to use a so-called headless browser, that is a browser without a graphical user interface. It's even possible to use Chrome in Headless mode.
End-to-end tests have the potential to be the most valuable category of tests, as they inspect the application through the same interface as real end-users.
There are also challenging aspects related to E2E tests. Configuring them is a lot more challenging than configuring unit and integration tests. E2E tests also tend to be quite slow to run, and in a larger application their execution time can range from minutes up to hours. This is unfortunate for application development, as it is extremely useful to be able to run tests as often as possible to catch any possible regressions quickly.
We will return to the topic of end-to-end testing in the final part of the course material.

