d
Custom hooks
React offers 10 different built-in hooks, of which the most popular ones are the useState and useEffect hooks, that we have already been using extensively.
Custom hooks
React offers the option to create our own custom hooks. According to React, the primary purpose of custom hooks is to facilitate the reuse of the logic used in components.
Building your own Hooks lets you extract component logic into reusable functions.
Custom hooks are regular JavaScript functions that can use any other hooks, as long as they adhere to the rules of hooks. Additionally, the name of custom hooks must start with the word use.
We implemented a counter application in part 1, that can have its value incremented, decremented, or reset. The code of the application is as follows:
import React, { useState } from 'react'
const App = (props) => {
  const [counter, setCounter] = useState(0)

  return (
    <div>
      <div>{counter}</div>
      <button onClick={() => setCounter(counter + 1)}>
        plus
      </button>
      <button onClick={() => setCounter(counter - 1)}>
        minus
      </button>
      <button onClick={() => setCounter(0)}>
        zero
      </button>
    </div>
  )
}
Let's extract the counter logic into its own custom hook. The code for the hook is as follows:
const useCounter = () => {
  const [value, setValue] = useState(0)

  const increase = () => {
    setValue(value + 1)
  }

  const decrease = () => {
    setValue(value - 1)
  }

  const zero = () => {
    setValue(0)
  }

  return {
    value,
    increase,
    decrease,
    zero
  }
}
Our custom hook uses the useState hook internally to create its own state. The hook returns an object, the properties of which include the value of the counter as well as functions for manipulating the value.
React components can use the hook as shown below:
const App = (props) => {
  const counter = useCounter()

  return (
    <div>
      <div>{counter.value}</div>
      <button onClick={counter.increase}>
        plus
      </button>
      <button onClick={counter.decrease}>
        minus
      </button>
      <button onClick={counter.zero}>
        zero
      </button>
    </div>
  )
}
By doing this we can extract the state of the App component and its manipulation entirely into the useCounter hook. Managing the counter state and logic is now the responsibility of the custom hook.
The same hook could be reused in the application that was keeping track of the amount of clicks made to the left and right buttons:
const App = () => {
  const left = useCounter()
  const right = useCounter()

  return (
    <div>
      {left.value}
      <button onClick={left.increase}>
        left
      </button>
      <button onClick={right.increase}>
        right
      </button>
      {right.value}
    </div>
  )
}
The application creates two completely separate counters. The first one is assigned to the variable left and the other to the variable right.
Dealing with forms in React is somewhat tricky. The following application presents the user with a form that requests the user to input their name, birthday, and height:
const App = () => {
  const [name, setName] = useState('')
  const [born, setBorn] = useState('')
  const [height, setHeight] = useState('')

  return (
    <div>
      <form>
        name:
        <input
          type='text'
          value={name}
          onChange={(event) => setName(event.target.value)}
        />
        <br/>
        birthdate:
        <input
          type='date'
          value={born}
          onChange={(event) => setBorn(event.target.value)}
        />
        <br />
        height:
        <input
          type='number'
          value={height}
          onChange={(event) => setHeight(event.target.value)}
        />
      </form>
      <div>
        {name} {born} {height}
      </div>
    </div>
  )
}
Every field of the form has its own state. In order to keep the state of the form synchronized with the data provided by the user, we have to register an appropriate onChange handler for each of the input elements.
Let's define our own custom useField hook, that simplifies the state management of the form:
const useField = (type) => {
  const [value, setValue] = useState('')

  const onChange = (event) => {
    setValue(event.target.value)
  }

  return {
    type,
    value,
    onChange
  }
}
The hook function receives the type of the input field as a parameter. The function returns all of the attributes required by the input: its type, value and the onChange handler.
The hook can be used in the following way:
const App = () => {
  const name = useField('text')
  // ...

  return (
    <div>
      <form>
        <input
          type={name.type}
          value={name.value}
          onChange={name.onChange}
        />
        // ...
      </form>
    </div>
  )
}
Spread attributes
We could simplify things a bit further. Since the name object has exactly all of the attributes that the input element expects to receive as props, we can pass the props to the element using the spread syntax in the following way:
<input {...name} /> As the example in the React documentation states, the following two ways of passing props to a component achieve the exact same result:
<Greeting firstName='Arto' lastName='Hellas' />

const person = {
  firstName: 'Arto',
  lastName: 'Hellas'
}

<Greeting {...person} />
The application gets simplified into the following format:
const App = () => {
  const name = useField('text')
  const born = useField('date')
  const height = useField('number')

  return (
    <div>
      <form>
        name:
        <input  {...name} />
        <br/>
        birthdate:
        <input {...born} />
        <br />
        height:
        <input {...height} />
      </form>
      <div>
        {name.value} {born.value} {height.value}
      </div>
    </div>
  )
}
Dealing with forms is greatly simplified when the unpleasant nitty-gritty details related to synchronizing the state of the form is encapsulated inside of our custom hook.
Custom hooks are clearly not only a tool for reuse, they also provide a better way for dividing our code into smaller modular parts.
Rules of hooks, revisited
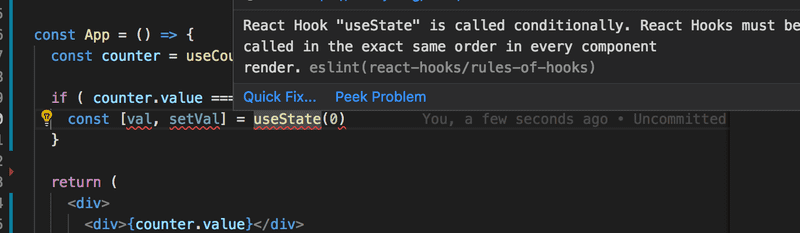
As mentioned in part 1, when using hooks we have to adhere to certain rules or limitations. Let's recap the rules of using hooks, copied verbatim from the official React documentation:
Don’t call Hooks inside loops, conditions, or nested functions. Instead, always use Hooks at the top level of your React function.
Don’t call Hooks from regular JavaScript functions. Instead, you can:
- Call Hooks from React function components.
- Call Hooks from custom Hooks
There's an existing ESlint rule that can be used to verify that the application uses hooks correctly.
After installing the rule eslint-plugin-react-hooks it is configured by modifying .eslintrc.js as follows:
module.exports = {
  // ...
  "plugins": [
    // ...
    "react-hooks"  ],
  "rules": {
    "react-hooks/rules-of-hooks": "error",    // ...
  }
};
Lint complains now if hooks are used in illegal manner:
More about hooks
The internet is starting to fill up with more and more helpful material related to hooks. The following sources are worth checking out:
Exercises
5.18: Blog list and hooks step1
Simplify the login form of your application with the useField custom hook we defined earlier.
One natural place to save the custom hooks of your application is in the /src/hooks/index.js file.
If you use the named export instead of the default export:
import { useState } from 'react'

export const useField = (type) => {  const [value, setValue] = useState('')

  const onChange = (event) => {
    setValue(event.target.value)
  }

  return {
    type,
    value,
    onChange
  }
}

// module can have several named exports
export const useAnotherHook = () => {  // ...
}
Then importing happens in the following way:
import  { useField } from './hooks'

const App = () => {
  // ...
  const username = useField('text')
  // ...
}
5.19: Blog list and hooks step2
The useField hook has a defect. It does not offer any way of clearing the form field. Expand the functionality of the hook so that it offers a new reset operation for clearing the field. Also take the improved hook into use in the form for creating a new blog post.
The forms of your application will work after making the necessary changes. However, depending on your solution you may see the following warning in your console:

We will return to this warning in the next exercise.
5.20: Blog list and hooks step3
If your solution did not cause a warning to appear in the console you have already finished this exercise.
If you see the warning in the console, make the necessary changes to get rid of the Invalid value for prop reset' on <input> tag console warning.
The reason for this warning is that after making the changes to your application, the following expression:
<input {...username}/>Essentially, is the same as this:
<input
  value={username.value}
  type={username.type}
  onChange={username.onChange}
  reset={username.reset}/>
The input element should not be given a reset attribute.
One simple fix would be to not use the spread syntax and write all of the forms like this:
<input
  value={username.value}
  type={username.type}
  onChange={username.onChange}
/>
If we were to do this we would lose much of the benefit provided by the useField hook. Instead, come up with a solution that fixes the issue, but is still easy to use with spread syntax.
5.21*: ultimate hooks
The code of the application responsible for communicating with the backend of the note application looks like this:
import axios from 'axios'
const baseUrl = '/api/notes'

let token = null

const setToken = newToken => {
  token = `bearer ${newToken}`
}

const getAll = () => {
  const request = axios.get(baseUrl)
  return request.then(response => response.data)
}

const create = async newObject => {
  const config = {
    headers: { Authorization: token },
  }

  const response = await axios.post(baseUrl, newObject, config)
  return response.data
}

const update = (id, newObject) => {
  const request = axios.put(`${ baseUrl } /${id}`, newObject)
  return request.then(response => response.data)
}

export default { getAll, create, update, setToken }
We notice that the code is in no way specific to the fact that our application deals with notes. Excluding the value of the baseUrl variable, the same code could be reused in the blog post application for dealing with the communication with the backend.
Extract the code for communicating with the backend into its own useResource hook. It is sufficient to implement fetching all resources and creating a new resource.
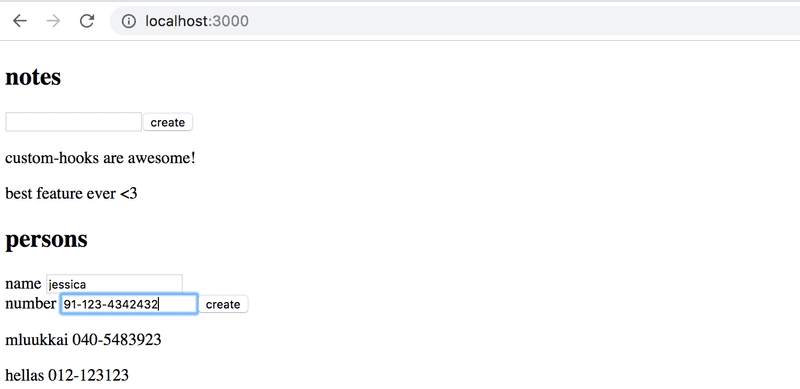
You can do the exercise for the project found in the https://github.com/fullstackopen-2019/custom-hooks repository. The App component for the project is the following:
const App = () => {
  const content = useField('text')
  const name = useField('text')
  const number = useField('text')

  const [notes, noteService] = useResource('http://localhost:3005/notes')
  const [persons, personService] = useResource('http://localhost:3005/persons')

  const handleNoteSubmit = (event) => {
    event.preventDefault()
    noteService.create({ content: content.value })
  }

  const handlePersonSubmit = (event) => {
    event.preventDefault()
    personService.create({ name: name.value, number: number.value})
  }

  return (
    <div>
      <h2>notes</h2>
      <form onSubmit={handleNoteSubmit}>
        <input {...content} />
        <button>create</button>
      </form>
      {notes.map(n => <p key={n.id}>{n.content}</p>)}

      <h2>persons</h2>
      <form onSubmit={handlePersonSubmit}>
        name <input {...name} /> <br/>
        number <input {...number} />
        <button>create</button>
      </form>
      {persons.map(n => <p key={n.id}>{n.name} {n.number}</p>)}
    </div>
  )
}
The useResource custom hook returns an array of two items just like the state hooks. The first item of the array contains all of the individual resources and the second item of the array is an object that can be used for manipulating the resource collection, like creating new ones.
If you implement the hook correctly, it can be used for both notes and phone numbers (start the server with the npm run server command at the port 3005).
This was the last exercise for this part of the course and it's time to push your code to GitHub and mark all of your finished exercises to the exercise submission system.

