b
Testing the backend
We will now start writing tests for the backend. Since the backend does not contain any complicated logic, it doesn't make sense to write unit tests for it. The only potential thing we could unit test is the toJSON method that is used for formatting notes.
In some situations, it can be beneficial to implement some of the backend tests by mocking the database instead of using a real database. One library that could be used for this is mongo-mock.
Since our application's backend is still relatively simple, we will make the decision to test the entire application through its REST API, so that the database is also included. This kind of testing where multiple components of the system are being tested as a group, is called integration testing.
Test environment
In one of the previous chapters of the course material, we mentioned that when your backend server is running in Heroku, it is in production mode.
The convention in Node is to define the execution mode of the application with the NODE_ENV environment variable. In our current application, we only load the environment variables defined in the .env file if the application is not in production mode.
It is common practice to define separate modes for development and testing.
Next, let's change the scripts in our package.json so that when tests are run, NODE_ENV gets the value test:
{
  // ...
  "scripts": {
    "start": "NODE_ENV=production node index.js",    "watch": "NODE_ENV=development nodemon index.js",    "build:ui": "rm -rf build && cd ../../osa2/notes/ && npm run build --prod && cp -r build ../../osa3/backend/",
    "deploy": "git push heroku master",
    "deploy:full": "npm run build:ui && git add . && git commit -m uibuild && git push && npm run deploy",
    "logs:prod": "heroku logs --tail",
    "lint": "eslint .",
    "test": "NODE_ENV=test jest --verbose --runInBand"  },
  // ...
}
We also added the runInBand option to the npm script that executes the tests. This option will prevent Jest from running tests in parallel; we will discuss its significance once our tests start using the database.
We specified the mode of the application to be development in the npm run watch script that uses nodemon. We also specified that the default npm start command will define the mode as production.
There is a slight issue in the way that we have specified the mode of the application in our scripts: it will not work on Windows. We can correct this by installing the cross-env package with the command:
npm install --save-dev cross-envWe can then achieve cross-platform compatibility by using the cross-env library in our npm scripts defined in package.json:
{
  // ...
  "scripts": {
    "start": "cross-env NODE_ENV=production node index.js",
    "watch": "cross-env NODE_ENV=development nodemon index.js",
    // ...
    "test": "cross-env NODE_ENV=test jest --verbose --runInBand",
  },
  // ...
}
Now we can modify the way that our application runs in different modes. As an example of this, we could define the application to use a separate test database when it is running tests.
We can create our separate test database in Mongo DB Atlas. This is not an optimal solution in situations where there are many people developing the same application. Test execution in particular typically requires that a single database instance is not used by tests that are running concurrently.
It would be better to run our tests using a database that is installed and running in the developer's local machine. The optimal solution would be to have every test execution use its own separate database. This is "relatively simple" to achieve by running Mongo in-memory or by using Docker containers. We will not complicate things and will instead continue to use the MongoDB Atlas database.
Let's make some changes to the module that defines the application's configuration:
require('dotenv').config()

let PORT = process.env.PORT
let MONGODB_URI = process.env.MONGODB_URI

if (process.env.NODE_ENV === 'test') {  MONGODB_URI = process.env.TEST_MONGODB_URI}
module.exports = {
  MONGODB_URI,
  PORT
}
The code imports the environment variables from the .env file if it is not in production mode. In production mode our application will use the environment variables defined in Heroku.
The .env file has separate variables for the database addresses of the development and test databases (the addresses shown in the example are for locally running databases):
MONGODB_URI=mongodb+srv://fullstack:secred@cluster0-ostce.mongodb.net/note-app?retryWrites=true
PORT=3001

TEST_MONGODB_URI=mongodb+srv://fullstack:fullstack@cluster0-ostce.mongodb.net/note-app-test?retryWrites=true
The config module that we have implemented slightly resembles the node-config package. Writing our own implementation is justified since our application is simple, and also because it teaches us valuable lessons.
These are the only changes we need to make to our application's code.
You can find the code for our current application in its entirety in the part4-2 branch of this github repository.
supertest
Let's use the supertest package to help us write our tests for testing the API.
We will install the package as a development dependency:
npm install --save-dev supertestLet's write our first test in the tests/note_api.test.js file:
const mongoose = require('mongoose')
const supertest = require('supertest')
const app = require('../app')

const api = supertest(app)

test('notes are returned as json', async () => {
  await api
    .get('/api/notes')
    .expect(200)
    .expect('Content-Type', /application\/json/)
})

afterAll(() => {
  mongoose.connection.close()
})
The test imports the Express application from the app.js module and wraps it with the supertest function into a so-called superagent object. This object is assigned to the api variable and tests can use it for making HTTP requests to the backend.
Our test makes an HTTP GET request to the api/notes url and verifies that the request is responded to with the status code 200. The test also verifies that the Content-Type header is set to application/json, indicating that the data is in the desired format.
The test contains some details that we will explore a bit later on. The arrow function that defines the test is preceded by the async keyword and the method call for the api object is preceded by the await keyword. We will write a few tests and then take a closer look at this async/await magic. Do not concern yourself with them for now, just be assured that the example tests work correctly. The async/await syntax is related to the fact that making a request to the API is an asynchronous operation. The Async/await syntax can be used for writing asynchronous code with the appearance of synchronous code.
Once all the tests (there is currently only one) have finished running we have to close the database connection used by Mongoose. This can be easily achieved with the afterAll method:
afterAll(() => {
  mongoose.connection.close()
})
When running your tests you may run across the following console warning:

If this occurs, let's follow the instructions and add a jest.config.js file at the root of the project with the following content:
module.exports = {
  testEnvironment: 'node'
}
One tiny but important detail: at the beginning of this part we extracted the Express application into the app.js file, and the role of the index.js file was changed to launch the application at the specified port with Node's built-in http object:
const app = require('./app') // the actual Express app
const http = require('http')
const config = require('./utils/config')

const server = http.createServer(app)

server.listen(config.PORT, () => {
  console.log(`Server running on port ${config.PORT}`)
})
The tests only use the express application defined in the app.js file:
const mongoose = require('mongoose')
const supertest = require('supertest')
const app = require('../app')
const api = supertest(app)
// ...
The documentation for supertest says the following:
if the server is not already listening for connections then it is bound to an ephemeral port for you so there is no need to keep track of ports.
In other words, supertest takes care that the application being tested is started at the port that it uses internally.
Let's write a few more tests:
test('there are four notes', async () => {
  const response = await api.get('/api/notes')

  expect(response.body.length).toBe(4)
})

test('the first note is about HTTP methods', async () => {
  const response = await api.get('/api/notes')

  expect(response.body[0].content).toBe('HTML is easy')
})
Both tests store the response of the request to the response variable, and unlike the previous test that used the methods provided by supertest for verifying the status code and headers, this time we are inspecting the response data stored in response.body property. Our tests verify the format and content of the response data with the expect method of Jest.
The benefit of using the async/await syntax is starting to become evident. Normally we would have to use callback functions to access the data returned by promises, but with the new syntax things are a lot more comfortable:
const res = await api.get('/api/notes')

// execution gets here only after the HTTP request is complete
// the result of HTTP request is saved in variable res
expect(res.body.length).toBe(4)
Logger
The logger middleware that outputs information about the HTTP requests is obstructing the test execution output. It's a good idea to prevent logging when the application is in test mode. While we're at it, let's extract console logging into its own utils/logger.js module:
const info = (...params) => {
  if (process.env.NODE_ENV !== 'test') {
    console.log(...params)
  }
}

const error = (...params) => {
  console.error(...params)
}

module.exports = {
  info, error
}
The logger offers two functions. The info function does not print anything if the application is in test mode. The error function intended for error logging will still print to console in test mode.
Let's take the logger into use in the application. We will need to make changes to the file that defines the middleware of the application:
const logger = require('./logger')
const requestLogger = (request, response, next) => {
  logger.info('Method:', request.method)  logger.info('Path:  ', request.path)  logger.info('Body:  ', request.body)  logger.info('---')  next()
}

const unknownEndpoint = (request, response) => {
  response.status(404).send({ error: 'unknown endpoint' })
}

const errorHandler = (error, request, response, next) => {
  logger.error(error.message)
  if (error.name === 'CastError' && error.kind === 'ObjectId') {
    return response.status(400).send({ error: 'malformatted id' })
  } else if (error.name === 'ValidationError') {
    return response.status(400).json({ error: error.message })
  }

  next(error)
}

module.exports = {
  requestLogger,
  unknownEndpoint,
  errorHandler
}
We also have to make changes to the app.js file that creates the Express application:
// ...
const logger = require('./utils/logger')
logger.info('connecting to', config.MONGODB_URI)
mongoose.connect(config.MONGODB_URI, { useNewUrlParser: true })
  .then(() => {
    logger.info('connected to MongoDB')  })
  .catch((error) => {
    logger.error('error connection to MongoDB:', error.message)  })

// ...
Extracting logging into its own module is a good idea in more ways than one. If we wanted to start writing logs to a file or send them to an external logging service like graylog or papertrail we would only have to make changes in one place.
Initializing the database before tests
Testing appears to be easy and our tests are currently passing. However, our tests are bad as they are dependent on the state of the database (that happens to be correct in my test database). In order to make our tests more robust, we have to reset the database and generate the needed test data in a controlled manner before we run the tests.
Our tests are already using the afterAll function of Jest to close the connection to the database after the tests are finished executing. Jest offers many other functions that can be used for executing operations once before any test is run, or every time before a test is run.
Let's initialize the database before every test with the beforeEach function:
const mongoose = require('mongoose')
const supertest = require('supertest')
const app = require('../app')
const api = supertest(app)
const Note = require('../models/note')

const initialNotes = [
  {
    content: 'HTML is easy',
    date: new Date(),
    important: false,
  },
  {
    content: 'Browser can execute only Javascript',
    date: new Date(),
    important: true,
  },
]

beforeEach(async () => {
  await Note.deleteMany({})

  let noteObject = new Note(initialNotes[0])
  await noteObject.save()

  noteObject = new Note(initialNotes[1])
  await noteObject.save()
})
The database is cleared out at the beginning, and after that we save the two notes stored in the initialNotes array to the database. Doing this, we ensure that the database is in the same state before every test is run.
Let's also make the following changes to the last two tests:
test('all notes are returned', async () => {
  const response = await api.get('/api/notes')

  expect(response.body.length).toBe(initialNotes.length)})

test('a specific note is within the returned notes', async () => {
  const response = await api.get('/api/notes')

  const contents = response.body.map(r => r.content)
  expect(contents).toContain(
    'Browser can execute only Javascript'  )
})
Pay special attention to the expect in the latter test. The response.body.map(r => r.content) command is used to create an array containing the content of every note returned by the API. The toContain method is used for checking that the note given to it as a parameter is in the list of notes returned by the API.
Running tests one by one
The npm test command executes all of the tests of the application. When we are writing tests, it is usually wise to only execute one or two tests. Jest offers a few different ways of accomplishing this, one of which is the only method. If tests are written across many files, this method is not great.
A better option is to use Jest directly without npm. This way we can specify which are the tests that we want to run with Jest. The following command only runs the tests found in the tests/note_api.test.js file:
npx jest tests/note_api.test.js --runInBandThe -t option can be used for running tests with a specific name:
npx jest -t 'a specific note is within the returned notes'The provided parameter can refer to the name of the test or the describe block. The parameter can also contain just a part of the name. The following command will run all of the tests that contain notes in their name:
npx jest -t 'notes' --runInBandIf you install Jest globally with the command:
npm install -g jestThen you can run tests directly with the jest command. To install packages globally you need to have admin rights.
async/await
Before we write more tests let's take a look at the async and await keywords.
The async/await syntax that was introduced in ES7 makes it possible to use asynchronous functions that return a promise in a way that makes the code look synchronous.
As an example, the fetching of notes from the database with promises looks like this:
Note.find({}).then(notes => {
  console.log('operation returned the following notes', notes)
})
The Note.find() method returns a promise and we can access the result of the operation by registering a callback function with the then method.
All of the code we want to execute once the operation finishes is written in the callback function. If we wanted to make several asynchronous function calls in sequence, the situation would soon become painful. The asynchronous calls would have to be made in the callback. This would likely lead to complicated code and could potentially give birth to a so-called callback hell.
By chaining promises we could keep the situation somewhat under control, and avoid callback hell by creating a fairly clean chain of then method calls. We have seen a few of these during the course. To illustrate this, you can view an artificial example of a function that fetches all notes and then deletes the first one:
Note.find({})
  .then(notes => {
    return notes[0].remove()
  })
  .then(response => {
    console.log('the first note is removed')
    // more code here
  })
The then-chain is alright, but we can do better. The generator functions introduced in ES6 provided a clever way of writing asynchronous code in a way that "looks synchronous". The syntax is a bit clunky and not widely used.
The async and await keywords introduced in ES7 bring the same functionality as the generators, but in an understandable and syntactically cleaner way to the hands of all citizens of the JavaScript world.
We could fetch all of the notes in the database by utilizing the await operator like this:
const notes = await Note.find({})

console.log('operation returned the following notes', notes)
The code looks exactly like synchronous code. The execution of code pauses at const notes = await Note.find({}) and waits until the related promise is fulfilled, and then continues its execution to the next line. When the execution continues, the result of the operation that returned a promise is assigned to the notes variable.
The slightly complicated example presented above could be implemented by using await like this:
const notes = await Note.find({})
const response = await notes[0].remove()

console.log('the first note is removed')
Thanks to the new syntax, the code is a lot simpler than the previous then-chain.
There are a few important details to pay attention to when using async/await syntax. In order to use the await operator with asynchronous operations, they have to return a promise. This is not a problem as such, as regular asynchronous functions using callbacks are easy to wrap around promises.
The await keyword can't be used just anywhere in JavaScript code. Using await is possible only inside of an async function.
This means that in order for the previous examples to work, they have to be using async functions. Notice the first line in the arrow function definition:
const main = async () => {  const notes = await Note.find({})
  console.log('operation returned the following notes', notes)

  const response = await notes[0].remove()
  console.log('the first note is removed')
}

main()
The code declares that the function assigned to main is asynchronous. After this the code calls the function with main().
async/await in the backend
Let's change the backend to async and await. As all of the asynchronous operations are currently done inside of a function, it is enough to change the route handler functions into async functions.
The route for fetching all notes gets changed to the following:
notesRouter.get('/', async (request, response) => {
  const notes = await Note.find({})
  response.json(notes.map(note => note.toJSON()))
})
We can verify that our refactoring was successful by testing the endpoint through the browser and by running the tests that we wrote earlier.
You can find the code for our current application in its entirety in the part4-3 branch of this Github repository.
More tests and refactoring the backend
When code gets refactored, there is always the risk of regression, meaning that existing functionality may break. Let's refactor the remaining operations by first writing a test for each route of the API.
Let's start with the operation for adding a new note. Let's write a test that adds a new note and verifies that the amount of notes returned by the API increases, and that the newly added note is in the list.
test('a valid note can be added ', async () => {
  const newNote = {
    content: 'async/await simplifies making async calls',
    important: true,
  }

  await api
    .post('/api/notes')
    .send(newNote)
    .expect(201)
    .expect('Content-Type', /application\/json/)

  const response = await api.get('/api/notes')

  const contents = response.body.map(r => r.content)

  expect(response.body.length).toBe(initialNotes.length + 1)
  expect(contents).toContain(
    'async/await simplifies making async calls'
  )
})
The test passes just like we hoped and expected it to.
Let's also write a test that verifies that a note without content will not be saved into the database.
test('note without content is not added', async () => {
  const newNote = {
    important: true
  }

  await api
    .post('/api/notes')
    .send(newNote)
    .expect(400)

  const response = await api.get('/api/notes')

  expect(response.body.length).toBe(initialNotes.length)
})
Both tests check the state stored in the database after the saving operation, by fetching all the notes of the application.
const response = await api.get('/api/notes')The same verification steps will repeat in other tests later on, and it is a good idea to extract these steps into helper functions. Let's add the function into a new file called tests/test_helper.js that is in the same directory as the test file.
const Note = require('../models/note')

const initialNotes = [
  {
    content: 'HTML is easy',
    important: false
  },
  {
    content: 'Browser can execute only Javascript',
    important: true
  }
]

const nonExistingId = async () => {
  const note = new Note({ content: 'willremovethissoon' })
  await note.save()
  await note.remove()

  return note._id.toString()
}

const notesInDb = async () => {
  const notes = await Note.find({})
  return notes.map(note => note.toJSON())
}

module.exports = {
  initialNotes, nonExistingId, notesInDb
}
The module defines the notesInDb function that can be used for checking the notes stored in the database. The initialNotes array containing the initial database state is also in the module. We also define the nonExistingId function ahead of time, that can be used for creating a database object ID that does not belong to any note object in the database.
Our tests can now use helper module and be changed like this:
const supertest = require('supertest')
const mongoose = require('mongoose')
const helper = require('./test_helper')const app = require('../app')
const api = supertest(app)

const Note = require('../models/note')

beforeEach(async () => {
  await Note.deleteMany({})

  let noteObject = new Note(helper.initialNotes[0])  await noteObject.save()

  noteObject = new Note(helper.initialNotes[1])  await noteObject.save()
})

test('notes are returned as json', async () => {
  await api
    .get('/api/notes')
    .expect(200)
    .expect('Content-Type', /application\/json/)
})

test('all notes are returned', async () => {
  const response = await api.get('/api/notes')

  expect(response.body.length).toBe(helper.initialNotes.length)})

test('a specific note is within the returned notes', async () => {
  const response = await api.get('/api/notes')

  const contents = response.body.map(r => r.content)
  expect(contents).toContain(
    'Browser can execute only Javascript'
  )
})

test('a valid note can be added ', async () => {
  const newNote = {
    content: 'async/await simplifies making async calls',
    important: true,
  }

  await api
    .post('/api/notes')
    .send(newNote)
    .expect(201)
    .expect('Content-Type', /application\/json/)


  const notesAtEnd = await helper.notesInDb()  expect(notesAtEnd.length).toBe(helper.initialNotes.length + 1)
  const contents = notesAtEnd.map(n => n.content)  expect(contents).toContain(
    'async/await simplifies making async calls'
  )
})

test('note without content is not added', async () => {
  const newNote = {
    important: true
  }

  await api
    .post('/api/notes')
    .send(newNote)
    .expect(400)

  const notesAtEnd = await helper.notesInDb()
  expect(notesAtEnd.length).toBe(helper.initialNotes.length)})

afterAll(() => {
  mongoose.connection.close()
})
The code using promises works and the tests pass. We are ready to refactor our code to use the async/await syntax.
We make the following changes to our code (notice that the route handler definition is preceded by the async keyword):
notesRouter.post('/', async (request, response, next) => {
  const body = request.body

  const note = new Note({
    content: body.content,
    important: body.important === undefined ? false : body.important,
    date: new Date(),
  })

  const savedNote = await note.save()
  response.json(savedNote.toJSON())
})
There's a slight problem with our code: we don't handle error situations. How should we deal with them?
Error handling and async/await
If there's an exception while handling the POST request we end up in a familiar situation:
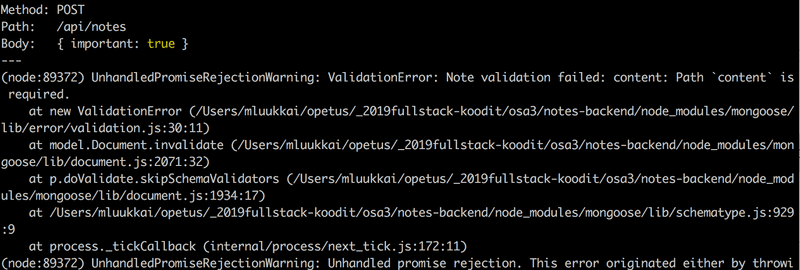
In other words we end up with an unhandled promise rejection, and the request never receives a response.
With async/await the recommended way of dealing with exceptions is the old and familiar try/catch mechanism:
notesRouter.post('/', async (request, response, next) => {
  const body = request.body

  const note = new Note({
    content: body.content,
    important: body.important === undefined ? false : body.important,
    date: new Date(),
  })
  try {     const savedNote = await note.save()    response.json(savedNote.toJSON())  } catch(exception) {    next(exception)  }})
The catch block simply calls the next function, which passes the request handling to the error handling middleware.
After making the change, all of our tests will pass once again.
Next, let's write tests for fetching and removing an individual note:
test('a specific note can be viewed', async () => {
  const notesAtStart = await helper.notesInDb()

  const noteToView = notesAtStart[0]

  const resultNote = await api    .get(`/api/notes/${noteToView.id}`)    .expect(200)    .expect('Content-Type', /application\/json/)
  expect(resultNote.body).toEqual(noteToView)
})

test('a note can be deleted', async () => {
  const notesAtStart = await helper.notesInDb()
  const noteToDelete = notesAtStart[0]

  await api    .delete(`/api/notes/${noteToDelete.id}`)    .expect(204)
  const notesAtEnd = await helper.notesInDb()

  expect(notesAtEnd.length).toBe(
    helper.initialNotes.length - 1
  )

  const contents = notesAtEnd.map(r => r.content)

  expect(contents).not.toContain(noteToDelete.content)
})
Both tests share a similar structure. In the initialization phase they fetch a note from the database. After this, the tests call the actual operation being tested, which is highlighted in the code block. Lastly, the tests verify that the outcome of the operation is as expected.
The tests pass and we can safely refactor the tested routes to use async/await:
notesRouter.get('/:id', async (request, response, next) => {
  try{
    const note = await Note.findById(request.params.id)
    if (note) {
      response.json(note.toJSON())
    } else {
      response.status(404).end()
    }
  } catch(exception) {
    next(exception)
  }
})

notesRouter.delete('/:id', async (request, response, next) => {
  try {
    await Note.findByIdAndRemove(request.params.id)
    response.status(204).end()
  } catch (exception) {
    next(exception)
  }
})
The async/await syntax makes the code somewhat clearer, but the experienced benefit of the syntax is not as great as it would be in the case of multiple asynchronous function calls. The price of the async/await syntax is the syntactically heavy try/catch block. All of the route handlers indeed share the structure:
try {
  // do the async operations here
} catch(exception) {
  next(exception)
}
This begs the question, would it be possible to refactor the repeated catch block out from the route handler functions? There are some existing ways of accomplishing this, but we will skip them due to their complexity.
Not everyone is convinced that the async/await syntax is a good addition to JavaScript. To provide an example, you can read ES7 async functions - a step in the wrong direction.
You can find the code for our current application in its entirety in the part4-4 branch of this github repository. The same branch also contains a slightly improved version of tests from the next part of the course material.
Optimizing the beforeEach function
Let's return to writing our tests and take a closer look at the beforeEach function that sets up the tests:
beforeEach(async () => {
  await Note.deleteMany({})

  let noteObject = new Note(helper.initialNotes[0])
  await noteObject.save()

  noteObject = new Note(helper.initialNotes[1])
  await noteObject.save()
})
The function saves the first two notes from the helper.initialNotes array into the database with two separate operations. The solution is alright, but there's a better way of saving multiple objects to the database:
beforeEach(async () => {
  await Note.deleteMany({})
  console.log('cleared')

  helper.initialNotes.forEach(async (note) => {
    let noteObject = new Note(note)
    await noteObject.save()
    console.log('saved')
  })
  console.log('done')
})

test('notes are returned as json', async () => {
  console.log('entered test')
  // ...
}
We save the notes stored in the array into the database inside of a forEach loop. The tests don't quite seem to work however, so we have added some console logs to help us find the problem.
The console displays the following output:
cleared
done
entered test
saved
saved
Despite our use of the async/await syntax, our solution does not work like we expected it to. The test execution begins before the database is initialized!
The problem is that every iteration of the forEach loop generates its own asynchronous operation, and beforeEach won't wait for them to finish executing. In other words, the await commands defined inside of the forEach loop are not in the beforeEach function, but in separate functions that beforeEach will not wait for.
Since the execution of tests begins immediately after beforeEach has finished executing, the execution of tests begins before the database state is initialized.
One way of fixing this is to wait for all of the asynchronous operations to finish executing with the Promise.all method:
beforeEach(async () => {
  await Note.deleteMany({})

  const noteObjects = helper.initialNotes
    .map(note => new Note(note))
  const promiseArray = noteObjects.map(note => note.save())
  await Promise.all(promiseArray)
})
The solution is quite advanced despite its compact appearance. The noteObjects variable is assigned to an array of Mongoose objects that are created with the Note constructor for each of the notes in the helper.initialNotes array. The next line of code creates a new array that consists of promises, that are created by calling the save method of each item in the noteObjects array. In other words, it is an array of promises for saving each of the items to the database.
The Promise.all method can be used for transforming an array of promises into a single promise, that will be fulfilled once every promise in the array passed to it as a parameter is resolved. The last line of code await Promise.all(promiseArray) waits that every promise for saving a note is finished, meaning that the database has been initialized.
The returned values of each promise in the array can still be accessed when using the Promise.all method. If we wait for the promises to be resolved with the await syntax const results = await Promise.all(promiseArray), the operation will return an array that contains the resolved values for each promise in the promiseArray, and they appear in the same order as the promises in the array.
Promise.all executes the promises it receives in parallel. If the promises need to be executed in a particular order, this will be problematic. In situations like this, the operations can be executed inside of a for...of block, that guarantees a specific execution order.
beforeEach(async () => {
  await Note.deleteMany({})

  for (let note of helper.initialNotes) {
    let noteObject = new Note(note)
    await noteObject.save()
  }
})
The asynchronous nature of JavaScript can lead to surprising behavior, and for this reason, it is important to pay careful attention when using the async/await syntax. Even though the syntax makes it easier to deal with promises, it is still necessary to understand how promises work!
Exercises
NB: the material uses the toContain matcher in several places to verify that an array contains a specific element. It's worth noting that the method uses the === operator for comparing and matching elements, which means that it is often not well-suited for matching objects. In most cases, the appropriate method for verifying objects in arrays is the toContainEqual matcher. However, the model solutions don't check for objects in arrays with matchers, so using the method is not required for solving the exercises.
Warning: If you find yourself using async/await and then methods in the same code, it is almost guaranteed that you are doing something wrong. Use one or the other and don't mix the two.
4.8: Blog list tests, step1
Use the supertest package for writing a test that makes an HTTP GET request to the /api/blogs url. Verify that the blog list application returns the correct amount of blog posts in the JSON format.
Once the test is finished, refactor the route handler to use the async/await syntax instead of promises.
Notice that you will have to make similar changes to the code that were made in the material, like defining the test environment so that you can write tests that use their own separate database.
NB: When running the tests, you may run into the following warning:

If this happens, follow the instructions and create a new jest.config.js file at the root of the project with the following contents:
module.exports = {
  testEnvironment: 'node'
}
NB: when you are writing your tests it is better to not execute all of your tests, only execute the ones you are working on. Read more about this here.
4.9*: Blog list tests, step2
Write a test that verifies that the unique identifier property of the blog posts is named id, by default the database names the property _id. Verifying the existence of a property is easily done with Jest's toBeDefined matcher.
Make the required changes to the code so that it passes the test. The toJSON method discussed in part 3 is an appropriate place for defining the id parameter.
4.10: Blog list tests, step3
Write a test that verifies that making an HTTP POST request to the /api/blogs url successfully creates a new blog post. At the very least, verify that the total number of blogs in the system is increased by one. You can also verify that the content of the blog post is saved correctly to the database.
Once the test is finished, refactor the operation to use async/await instead of promises.
4.11*: Blog list tests, step4
Write a test that verifies that if the likes property is missing from the request, it will default to the value 0. Do not test the other properties of the created blogs yet.
Make the required changes to the code so that it passes the test.
4.12*: Blog list tests, step5
Write a test related to creating new blogs via the /api/blogs endpoint, that verifies that if the title and url properties are missing from the request data, the backend responds to the request with the status code 400 Bad Request.
Make the required changes to the code so that it passes the test.
Refactoring tests
Our test coverage is currently lacking. Some requests like GET /api/notes/:id and DELETE /api/notes/:id aren't tested when the request is sent with an invalid id. The grouping and organization of tests could also use some improvement, as all tests exist on the same "top level" in the test file. The readability of the test would improve if we group related tests with describe blocks.
Below is an example of the test file after making some minor improvements:
const supertest = require('supertest')
const mongoose = require('mongoose')
const helper = require('./test_helper')
const app = require('../app')
const api = supertest(app)

const Note = require('../models/note')

beforeEach(async () => {
  await Note.deleteMany({})

  const noteObjects = helper.initialNotes
    .map(note => new Note(note))
  const promiseArray = noteObjects.map(note => note.save())
  await Promise.all(promiseArray)
})

describe('when there is initially some notes saved', () => {
  test('notes are returned as json', async () => {
    await api
      .get('/api/notes')
      .expect(200)
      .expect('Content-Type', /application\/json/)
  })

  test('all notes are returned', async () => {
    const response = await api.get('/api/notes')

    expect(response.body.length).toBe(helper.initialNotes.length)
  })

  test('a specific note is within the returned notes', async () => {
    const response = await api.get('/api/notes')

    const contents = response.body.map(r => r.content)
    expect(contents).toContain(
      'Browser can execute only Javascript'
    )
  })

  describe('viewing a specific note', () => {
    test('succeeds with a valid id', async () => {
      const notesAtStart = await helper.notesInDb()

      const noteToView = notesAtStart[0]

      const resultNote = await api
        .get(`/api/notes/${noteToView.id}`)
        .expect(200)
        .expect('Content-Type', /application\/json/)

      expect(resultNote.body).toEqual(noteToView)
    })

    test('fails with statuscode 404 if note does not exist', async () => {
      const validNonexistingId = await helper.nonExistingId()

      console.log(validNonexistingId)

      await api
        .get(`/api/notes/${validNonexistingId}`)
        .expect(404)
    })

    test('fails with statuscode 400 id is invalid', async () => {
      const invalidId = '5a3d5da59070081a82a3445'

      await api
        .get(`/api/notes/${invalidId}`)
        .expect(400)
    })
  })

  describe('addition of a new note', () => {
    test('succeeds with valid data', async () => {
      const newNote = {
        content: 'async/await simplifies making async calls',
        important: true,
      }

      await api
        .post('/api/notes')
        .send(newNote)
        .expect(201)
        .expect('Content-Type', /application\/json/)


      const notesAtEnd = await helper.notesInDb()
      expect(notesAtEnd.length).toBe(helper.initialNotes.length + 1)

      const contents = notesAtEnd.map(n => n.content)
      expect(contents).toContain(
        'async/await simplifies making async calls'
      )
    })

    test('fails with status code 400 if data invaild', async () => {
      const newNote = {
        important: true
      }

      await api
        .post('/api/notes')
        .send(newNote)
        .expect(400)

      const notesAtEnd = await helper.notesInDb()

      expect(notesAtEnd.length).toBe(helper.initialNotes.length)
    })
  })

  describe('deletion of a note', () => {
    test('succeeds with status code 204 if id is valid', async () => {
      const notesAtStart = await helper.notesInDb()
      const noteToDelete = notesAtStart[0]

      await api
        .delete(`/api/notes/${noteToDelete.id}`)
        .expect(204)

      const notesAtEnd = await helper.notesInDb()

      expect(notesAtEnd.length).toBe(
        helper.initialNotes.length - 1
      )

      const contents = notesAtEnd.map(r => r.content)

      expect(contents).not.toContain(noteToDelete.content)
    })
  })
})

afterAll(() => {
  mongoose.connection.close()
})
The test output is grouped according to the describe blocks:
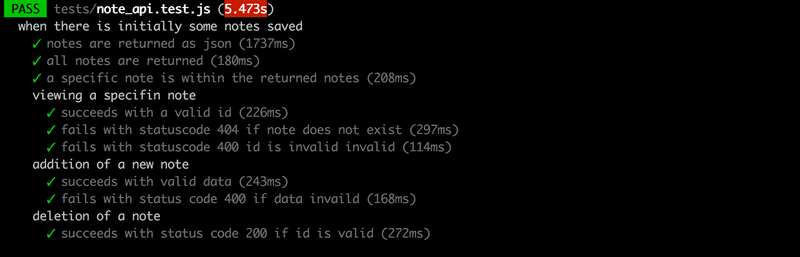
There is still room for improvement, but it is time to move forward.
This way of testing the API, by making HTTP requests and inspecting the database with Mongoose, is by no means the only nor the best way of conducting API-level integration tests for server applications. There is no universal best way of writing tests, as it all depends on the application being tested and available resources.
You can find the code for our current application in its entirety in the part4-5 branch of this Github repository.

