d
Validation and ESLint
There are usually constraints that we want to apply to the data that is stored in our application's database. Our application shouldn't accept notes that have a missing or empty content property. The validity of the note is checked in the route handler:
app.post('/api/notes', (request, response) => {
  const body = request.body
  if (body.content === undefined) {    return response.status(400).json({ error: 'content missing' })  }
  // ...
})
If the note does not have the content property, we respond to the request with the status code 400 bad request.
One smarter way of validating the format of the data before it is stored in the database, is to use the validation functionality available in Mongoose.
We can define specific validation rules for each field in the schema:
const noteSchema = new mongoose.Schema({
content: { type: String, minlength: 5, required: true }, date: { type: Date, required: true }, important: Boolean
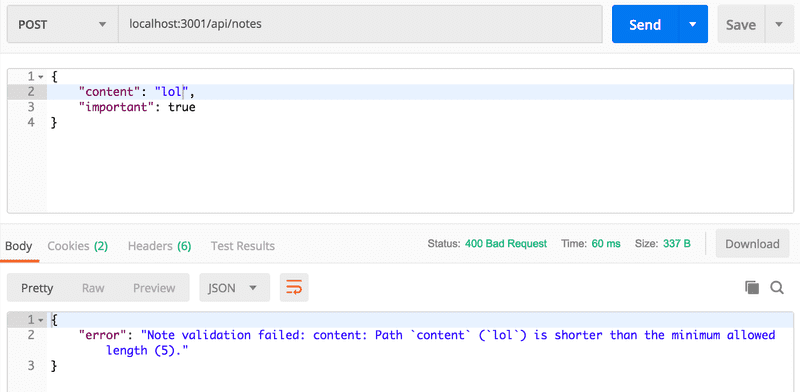
})The content field is now required to be at least five characters long. The date field is set as required, meaning that it can not be missing. The same constraint is also implicitly applied to the content field, since the minimum length constraint by default requires the field to not be missing. We have not added any constraints to the important field, so its definition in the schema has not changed.
The minlength and required validators are built-in and provided by Mongoose. The Mongoose custom validator functionality allows us to create new validators, if none of the built-in ones cover our needs.
If we try to store an object in the database that breaks one of the constraints, the operation will throw an exception. Let's change our handler for creating a new note so that it passes any potential exceptions to the error handler middleware:
app.post('/api/notes', (request, response, next) => {
  const body = request.body

  const note = new Note({
    content: body.content,
    important: body.important || false,
    date: new Date(),
  })

  note.save()
    .then(savedNote => {
      response.json(savedNote.toJSON())
    })
    .catch(error => next(error))})
Let's expand the error handler to deal with these validation errors:
const errorHandler = (error, request, response, next) => {
  console.error(error.message)

  if (error.name === 'CastError' && error.kind == 'ObjectId') {
    return response.status(400).send({ error: 'malformatted id' })
  } else if (error.name === 'ValidationError') {    return response.status(400).json({ error: error.message })  }

  next(error)
}
When validating an object fails, we return the following default error message from Mongoose:
Promise chaining
Many of the route handlers changed the response data into the right format by calling the toJSON method. When we created a new note, the toJSON method was called for the object passed as a parameter to then:
app.post('/api/notes', (request, response, next) => {
  // ...

  note.save()
    .then(savedNote => {
      response.json(savedNote.toJSON())
    })
    .catch(error => next(error))
})
We can accomplish the same functionality in a much cleaner way with promise chaining:
app.post('/api/notes', (request, response) => {
  // ...

  note
    .save()
    .then(savedNote => {      return savedNote.toJSON()    })    .then(savedAndFormattedNote => {      response.json(savedAndFormattedNote)    })     .catch(error => next(error))
})
In the first then we receive savedNote object returned by Mongoose and format it. The result of the operation is returned. Then as we discussed earlier, the then method of a promise also returns a promise. This means that when we return savedNote.toJSON() from the callback function, we are actually creating a promise that receives the formatted note as its value. We can access the formatted note by registering a new callback function with the then method.
We can clean up our code even more by using the more compact syntax for arrow functions:
app.post('/api/notes', (request, response) => {
  // ...

  note
    .save()
    .then(savedNote => savedNote.toJSON())    .then(savedAndFormattedNote => {
      response.json(savedAndFormattedNote)
    })
    .catch(error => next(error))
})
In this example, Promise chaining does not provide much of a benefit. The situation would change if there were many asynchronous operations that had to be done in sequence. We will not delve further into the topic. In the next part of the course we will learn about the async/await syntax in JavaScript, that will make writing subsequent asynchronous operations a lot easier.
Deploying the database backend to production
The application should work almost as-is in Heroku. We do have to generate a new production build of the frontend due to the changes that we have made to our frontend.
The environment variables defined in dotenv will only be used when the backend is not in production mode, i.e. Heroku.
We defined the environment variables for development in file .env, but the environment variable that defines the database URL in production should be set to Heroku with the heroku config:set command.
heroku config:set MONGODB_URI=mongodb+srv://fullstack:secred@cluster0-ostce.mongodb.net/note-app?retryWrites=trueThe application should now work. Sometimes things don't go according to plan. If there are problems, heroku logs will be there to help. My own application did not work after making the changes. The logs showed the following:
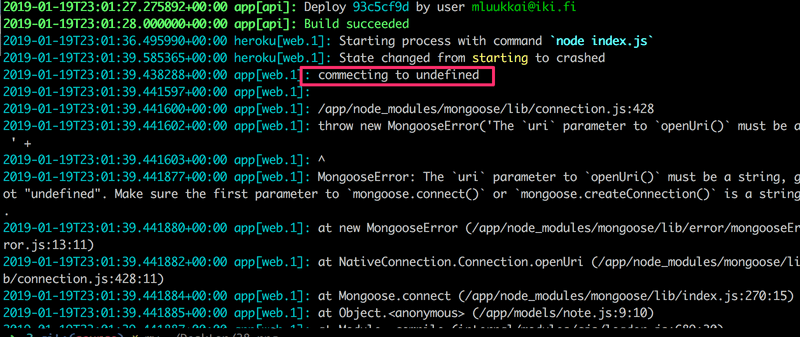
For some reason the URL of the database was undefined. The heroku config command revealed that I had accidentally defined the URL to the MONGO_URL environment variable, when the code expected it to be in MONGODB_URI.
You can find the code for our current application in its entirety in the part3-5 branch of this github repository.
Exercises
3.19: Phonebook database, step7
Add validation to your application, that will make sure that you can only add one number for a person in the phonebook. Our current frontend won't allow users to try and create duplicates, but we can attempt to create them directly with Postman or the VS Code REST client.
Mongoose does not offer a built-in validator for this purpose. Install the mongoose-unique-validator package with npm and use it instead.
If an HTTP POST request tries to add a name that is already in the phonebook, the server must respond with an appropriate status code and error message.
3.20*: Phonebook database, step8
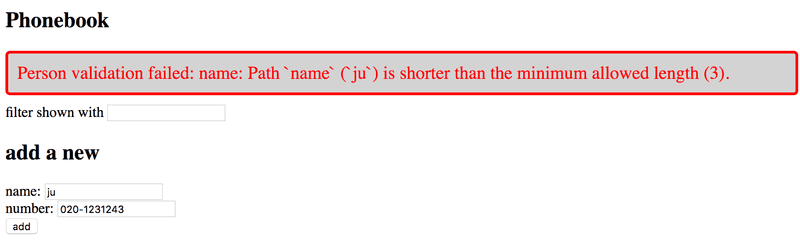
Expand the validation so that the name stored in the database has to be at least three characters long, and the phone number must have at least 8 digits.
Expand the frontend so that it displays some form of error message when a validation error occurs. Error handling can be implemented by adding a catch block as shown below:
personService
    .create({ ... })
    .then(createdPerson => {
      // ...
    })
    .catch(error => {
      // this is the way to access the error message
      console.log(error.response.data)
    })
You can display the default error message returned by Mongoose, even though they are not as readable as they could be:
3.21 Deploying the database backend to production
Generate a new "full stack" version of the application by creating a new production build of the frontend, and copy it to the backend repository. Verify that everything works locally by using the entire application from the address https://localhost:3001.
Push the latest version to Heroku and verify that everything works there as well.
Lint
Before we move onto the next part, we will take a look at an important tool called lint. Wikipedia says the following about lint:
Generically, lint or a linter is any tool that detects and flags errors in programming languages, including stylistic errors. The term lint-like behavior is sometimes applied to the process of flagging suspicious language usage. Lint-like tools generally perform static analysis of source code.
In compiled statically typed languages like Java, IDEs like NetBeans can point out errors in the code, even ones that are more than just compile errors. Additional tools for performing static analysis like checkstyle, can be used for expanding the capabilities of the IDE to also point out problems related to style, like indentation.
In the JavaScript universe, the current leading tool for static analysis aka. "linting" is ESlint.
Let's install ESlint as a development dependency to the backend project with the command:
npm install eslint --save-devAfter this we can initialize a default ESlint configuration with the command:
node_modules/.bin/eslint --initWe will answer all of the questions:
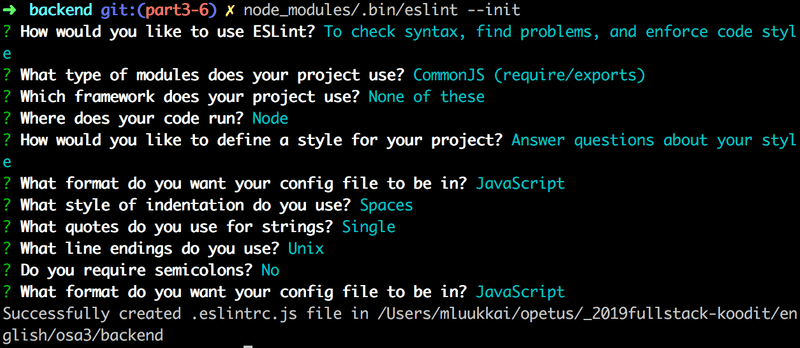
The configuration will be saved in the .eslintrc.js file:
module.exports = {
    'env': {
        'commonjs': true,
        'es6': true,
        'node': true
    },
    'extends': 'eslint:recommended',
    'globals': {
        'Atomics': 'readonly',
        'SharedArrayBuffer': 'readonly'
    },
    'parserOptions': {
        'ecmaVersion': 2018
    },
    'rules': {
        'indent': [
            'error',
            4
        ],
        'linebreak-style': [
            'error',
            'unix'
        ],
        'quotes': [
            'error',
            'single'
        ],
        'semi': [
            'error',
            'never'
        ]
    }
}
Let's immediately change the rule concerning indentation, so that the indentation level is two spaces.
"indent": [
    "error",
    2
],
Inspecting and validating a file like index.js can be done with the following command:
node_modules/.bin/eslint index.jsIt is recommended to create a separate npm script for linting:
{
  // ...
  "scripts": {
    "start": "node index.js",
    "watch": "nodemon index.js",
    "lint": "eslint ."
  },
  // ...
}
Now the npm run lint command will check every file in the project.
Also the files in the build directory get checked when the command is run. We do not want this to happen, and we can accomplish this by creating an .eslintignore file in the project's root with the following contents:
buildThis causes the entire build directory to not be checked by ESlint.
Lint has quite a lot to say about our code:
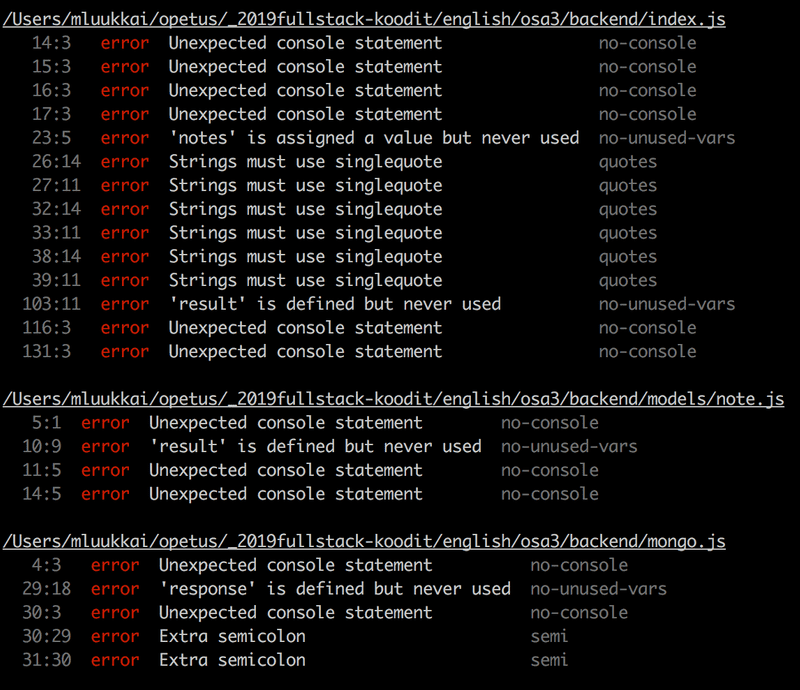
Let's not fix these issues just yet.
A better alternative to executing the linter from the command line is to configure a lint plugin to the editor, that runs the linter continuously. By using the plugin you will see errors in your code immediately. You can find more information about the Visual Studio ESLint plugin here.
The VS Code ESlint plugin will underline style violations with a red line:

This makes errors easy to spot and fix right away.
ESlint has a vast array of rules that are easy to take into use by editing the .eslintrc.js file.
Let's add the eqeqeq rule that warns us, if equality is checked with anything but the the triple equals operator. The rule is added under the rules field in the configuration file.
{
  // ...
  "rules": {
    // ...
    "eqeqeq": "error"
  },
}
While we're at it, let's make a few other changes to the rules.
Let's prevent unnecessary trailing spaces at the ends of lines, let's require that there is always a space before and after curly braces, and let's also demand a consistent use of whitespaces in the function parameters of arrow functions.
{
  // ...
  "rules": {
    // ...
    "eqeqeq": "error",
    "no-trailing-spaces": "error",
    "object-curly-spacing": [
        "error", "always"
    ],
    "arrow-spacing": [
        "error", { "before": true, "after": true }
    ]
  },
}
Our default configuration takes a bunch of predetermined rules into use from eslint:recommended:
"extends": "eslint:recommended",This includes a rule that warns about console.log commands. Disabling a rule can be accomplished by defining its "value" as 0 in the configuration file. Let's do this for the no-console rule in the meantime.
{
  // ...
  "rules": {
    // ...
    "eqeqeq": "error",
    "no-trailing-spaces": "error",
    "object-curly-spacing": [
        "error", "always"
    ],
    "arrow-spacing": [
        "error", { "before": true, "after": true }
    ],
    "no-console": 0  },
}
NB when you make changes to the .eslintrc.js file, it is recommended to run the linter from the command line. This will verify that the configuration file is correctly formatted:
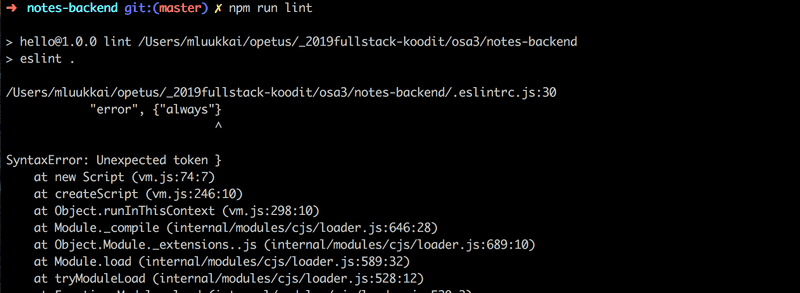
If there is something wrong in your configuration file, the lint plugin can behave quite erratically.
Many companies define coding standards that are enforced throughout the organization through the ESlint configuration file. It is not recommended to keep reinventing the wheel over and over again, and it can be a good idea to adopt a ready-made configuration from someone else's project into yours. Recently many projects have adopted the Airbnb Javascript style guide by taking Airbnb's ESlint configuration into use.
You can find the code for our current application in its entirety in the part3-6 branch of this github repository.

